In this module, you will learn how to use Annoto, an in-video discussion tool, to turn video watching into an interactive and collaborative learning activity. You will also learn how to use the learning analytics provided by Annoto Insights to gain insights into how students interact with the video content and with each other.
Why In-Video Discussions?
According to the results of a survey conducted among 1,792 students at Georgia Tech before the pandemic, most of them - 80% of residential students, and 95% of online students, agreed that instructional video was valuable in helping them learn. However, they considered it a big obstacle that they could not ask instructors or peers questions and get responses when they watched the videos.
What could we do to help mitigate this obstacle and make learning with videos more engaging and more effective?
Annoto is an in-video commenting and discussion tool that offers a potential solution for turning passive individual video viewing into an active and collaborative learning activity. It allows instructors and students to ask questions on specific moments in the video, and respond to each other's questions. While we have the alternative to conduct discussions on a video by using an online forum, Annoto has the advantages of situating the discussions in the context of the video and providing comprehensive analytics on how and when students interact with the video content and with each other.
How to set up Annoto for your videos and facilitate the in-video discussions? Let's get started!
Technology for In-Video Discussions: Annoto
What is Annoto?
Let's start by watching the short video below to get an overview of Annoto.
How to Access Annoto?
Annoto integrates with Kaltura, a media hosting platform licensed at Georgia Tech. It works as a plugin on top of the Kaltura video player. The screenshot below (Figure 1) shows what you will see when you open a Kaltura video that has Annoto enabled.
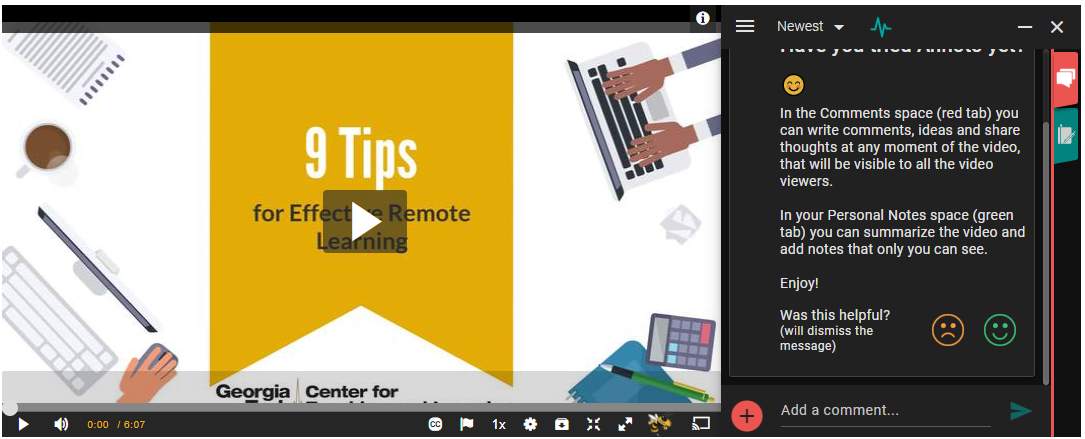
Right next to the video, there is a space for comments (red tab), where all users can add comments at any moment of the video, and respond to each other's comments. There is also a personal note space (green tab), where the users can add notes that are visible only to themselves.
How to Disable Annoto?
Currently, Annoto is enabled by default for videos accessed through the Kaltura app in Canvas, Media Gallery, your course media repository accessible to all students enrolled in the course. While it could be convenient that Annoto is enabled by default for all course videos, you have the option of disabling Annoto on all or specific media.
Disable Annoto on All Media
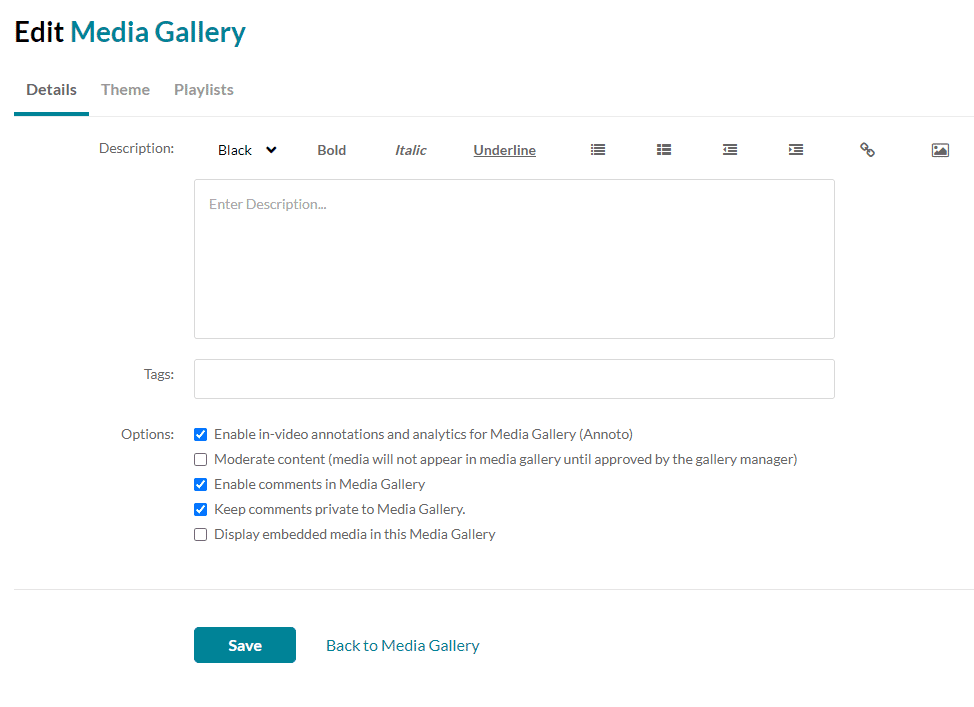
- Go to Media Gallery in Canvas and select Channel Actions on the upper right-hand corner of the screen.
- In the Details tab, go to the Options section, and uncheck the box next to "Enable in-video annotations and analytics for Media Gallery (Annoto)" (see Figure 2).
- Click the Save button to save the change.
Disable Annoto on a Specific Media
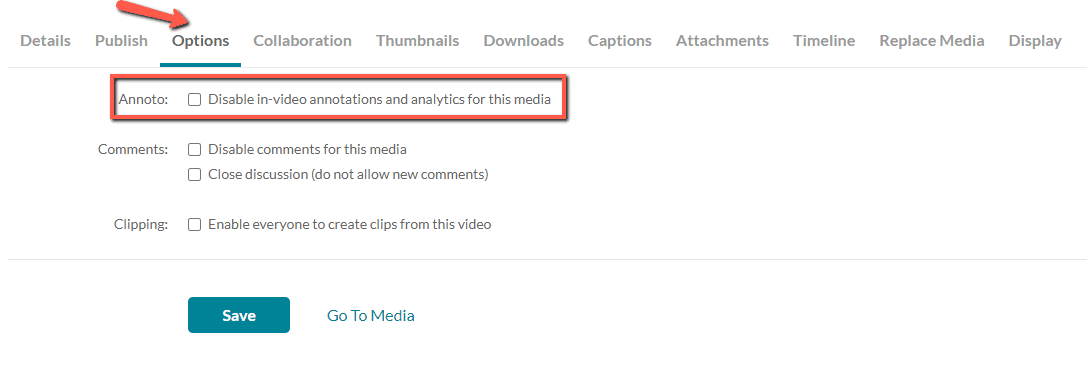
- Select the video in Media Gallery.
- Click on Actions and then Edit.
- Under the Options tab, check the box next to "Disable in-video annotations and analytics for this media" (see Figure 3 below)
- Click the Save button to save the change.
What Can You Do with Annoto?
Annoto offers four major functionalities that you can leverage to create an interactive and collaborative learning environment:
- Comments Space for Collaborative Learning: Similar to an online discussion forum, the Comments Space allows students to ask questions on specific moments of the video content and respond to each other's questions. The threaded discussions enable students to share ideas and perspectives and learn from each other.
- Personal Notes Space for Active Learning: The Personal Notes Space allows students to take an active role in their learning by taking notes when they watch videos.
User Space for Reflective Learning: The User Space helps students reflect on their learning by allowing them to review their learning activities in Annoto.
Annoto Insights for Making Informed Instructional Decisions: The Annoto Insights provides instructors with comprehensive analytics that can help instructors gain insights about how students interact with the video content and with each other and make informed instructional decisions.
Comment Space for Collaborative Learning
The short video below, Comments Walkthrough, gives you a quick overview of the features available in Comments Space.
In summary, here are the main features available in Comments Space:
- Add a comment
You can simply start typing in the "Add a comment" box when you want to add a comment. The video will be automatically paused. When you are typing your comment, you may click Shift + Enter to move to the next line.
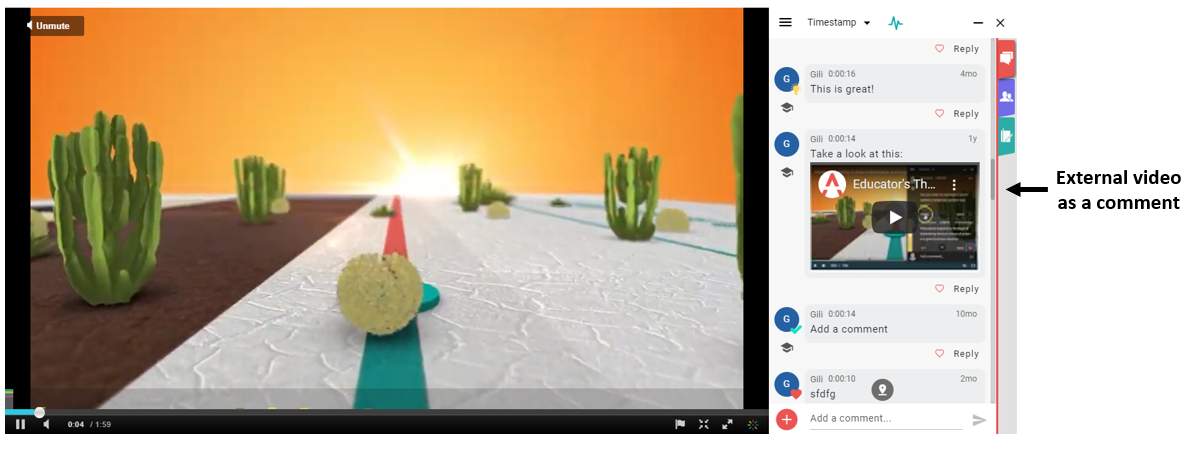
In addition to adding text comments, you could also record a video as a comment, or add an external video in your comment by adding a link to the video. As you can see from the screenshot below, the video will be embedded in the discussion in both cases.
- Reply to a comment
To reply to a comment, all you have to do is click on Reply below the comment, write and hit send. You can see the number of all replies below the comment. Clicking on the number will open the replies for you to read them all.
- Edit / Delete a comment
All users are free to edit or delete their own comments, 24 hours from when it was written, as long as no one replied to the comment. The deleted comments will not be seen as if it was never written.
Instructors can delete any comments posted if they are considered inappropriate.
- Add a sentiment to comments
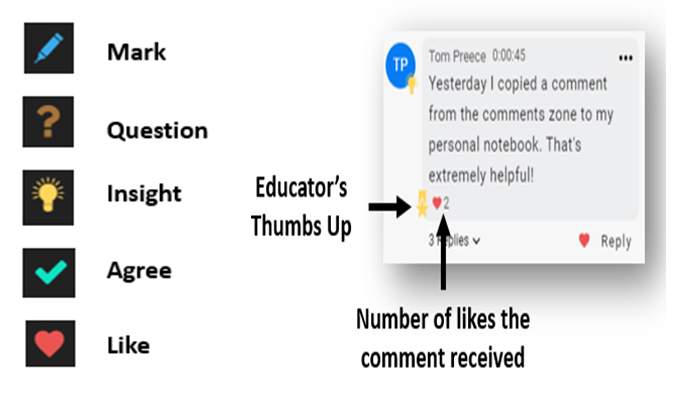
When you post a comment, you can add one of the following five sentiments to your comment: Mark, Question, Insight, Agree, and Like (see the screenshot below).
A comment can be "liked" simply by clicking on the red heart next to the "Reply" button. Whenever an instructor "likes" a comment, it will be marked with a yellow medal, indicating it is endorsed by the instructor.
- Anonymous comments
Students have the option of posting comments anonymously. In this case, the comments are only anonymous to other students. Instructors can see who posted it.
- Sort comments
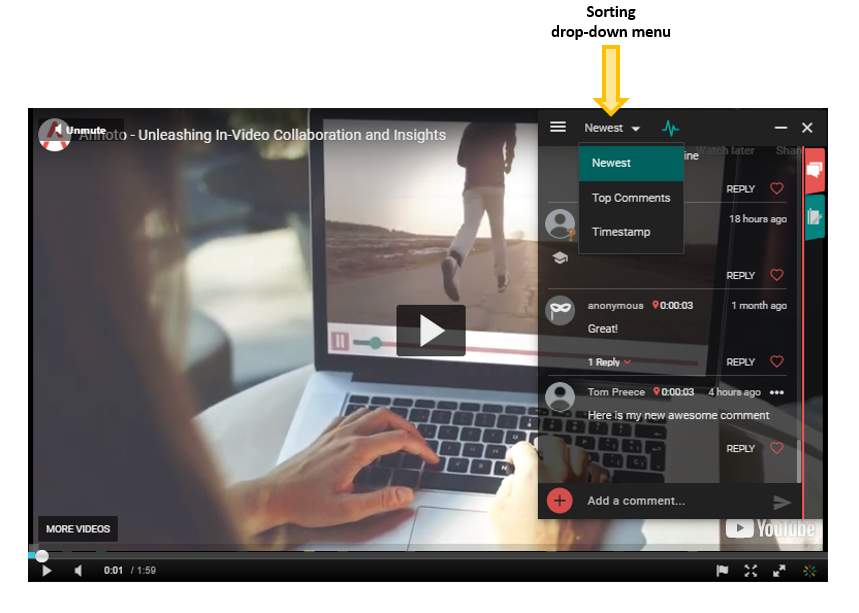
You can short the comments by clicking on the sorting drop-down menu (see the screenshot below). Comments can be sorted according to:
Newest - sort by the time when comments were posted (newest - first) Top Comments - sort by the comments that were most liked and replied to Timestamp - sort the comments by their time tag.
- View comments by timeline
At the bottom of a video, you can see there is a timeline that provides a visual representation of the comments and notes that were written on specific moments of the video.
The height of the bar on each moment represents the number of comments and notes, while the colors represent their sentiments. A high brown bar, for example, indicates that there are many question on that video moment. If no sentiment was used, the bar will be grey. Clicking on a bar in the timeline will take you to the moment and review the comments and notes (notes are only visible to individual students).
Watch the video below to learn more about the video timeline:
- Follow a discussion
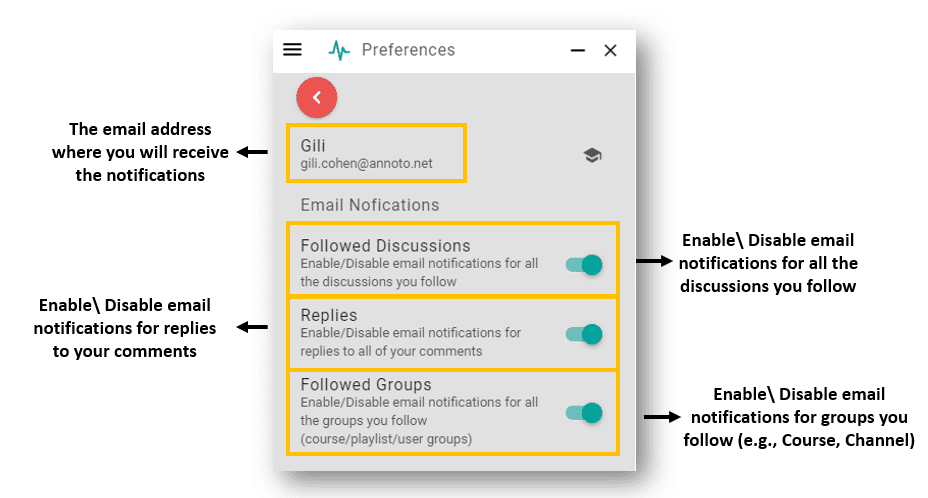
By default, you will not be notified of new comments and replies to the comments. However, if you would like to stay on top of things, you can choose to follow a discussion. Then you will receive a notification email whenever someone replies to your comments in the discussion, or whenever a new comment is added to the conversation.
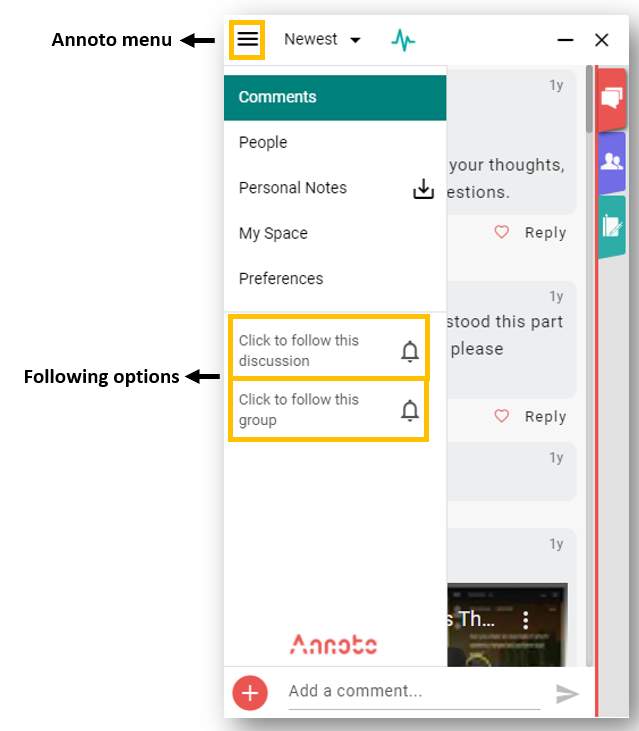
You have two following options:
- Follow this discussion - You will receive notifications for new comments and replies added on this particular video.
- Follow this group - You will receive notifications for new comments and replies added on any of the videos in the course.
Set notification preferences
You set your notification preference by clicking on "Preferences" in the menu. Please note that once you disable notifications in the preferences, you will no longer receive any email notifications for any of the discussions you follow.
Personal Notes Space for Active Learning
The Personal Notes Space encourages students to take an active role in their learning by taking notes to summarize, bookmark, and highlight specific moments of a video. The notes they wrote are only visible to themselves. Instructors can use their personal notes to reflect on the content and make instructional plans based on the discussion in the Comments Space.
Writing a personal note is similar to writing a comment. The difference is that the comments will be available for public view while the notes are personal.
Personal notes of a video, or all videos in a course, can be exported as Microsoft Word documents or Excel files. Each exported file contains:
- Course name
- Video name
- A link to the video
- Video duration
The notes are sorted chronologically. For each note, you can see its time tag (the time of the video it was written at), the date it was written, and the note's sentiment (if there was any). The video below demonstrates how to export your personal notes:
User Space for Reflective Learning
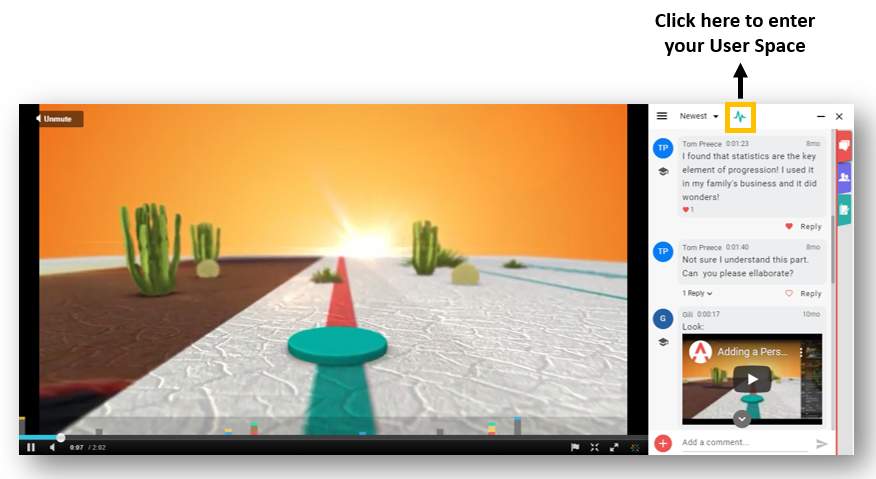
The User Space helps students reflect their learning by allowing them to review their learning activities in Annoto. They can enter their user space by clicking the green graph icon on the menu bar (see Figure 4 on the left).
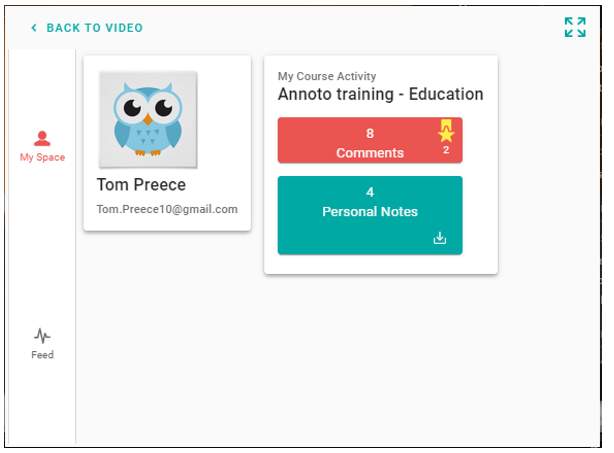
The user space is divided into two areas: My Space and Feed.
- My Space
My Space displays all your learning activities throughout the videos in your courses, for example:
Number of comments you added in the Comments Space
Number of personal notes you added in the Comments Space
Number of Educator's Thumbs Up you received
My Space also enables you to export all your personal notes on the course level.
- Feed
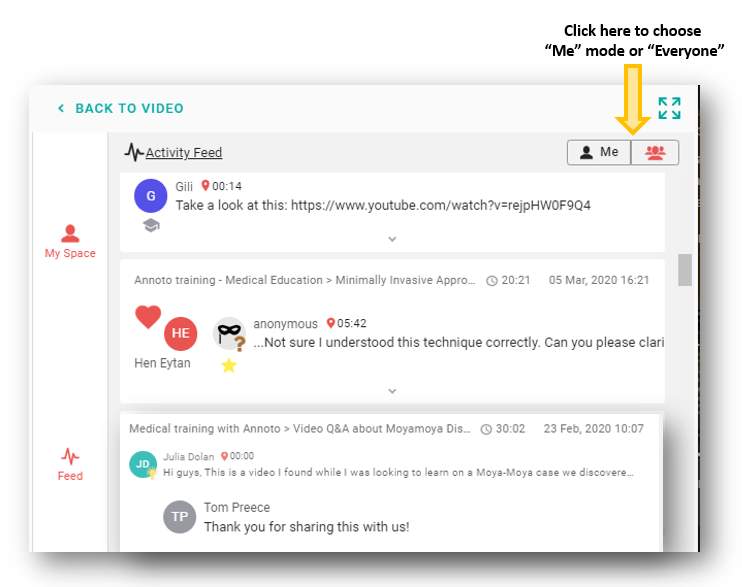
The Feed is an activity feed that allows you to see all the activities that happened to the videos followed by you. You can see the activities in two aspects:
- Me - It shows the content submitted by you.
- Everyone - It shows all the activities from everyone in the class.
Strategies for Using Annoto effectively
Here are a few strategies for using Annoto to effectively facilitate discussions and collaborations among students:
- Introduce Annoto to your students
Before you start using Annoto, you may send an email or a course announcement to the class, and explain to your students why you choose to use Annoto and how you expect them to use it. If possible, add a practice video for students to try Annoto and help them get familiar with the features available. Direct students to the Annoto Student Guides, which provide them with instructions on how to use various features, FAQs, and the Annoto support contact.
- Provide some question prompts
While some students are able to come up with very thoughtful questions, others may not know what questions to ask. Providing a few question prompts may help generate discussions and keep students focused on important content they should learn.
- Endorse good questions or comments
When you see a good question or comment from students, you may endorse it by liking it, which adds a medal to it. Adding this sentiment could encourage participation from students. Sometimes when there are confusing comments from students, your endorsement indicates a correct answer.
- Encourage students to take notes
The Personal Notes Space that allows students to take notes could turn the passive video watching into active learning. You may encourage your students to take notes when you assign a video for them to watch. You may also ask students to share their notes with another student for a think-pair-share activity during class.
- Use Annoto timeline to identify what students are struggling with
The Annoto timeline enables you to quickly find out which specific moments of the video get most questions from students, which could indicate that students are either most interested in or struggling with the video convent covered at those moments. You may want to address the questions in the discussions or during the class.
- Bring the discussions to the classroom
The discussions are not restricted to be in Annoto only. You can bring the questions or interesting perspectives that occurred in the discussions to the classroom, which will help motivate students to participate more in both the in-video and in-class discussions.
- Use Annoto Insights to gain actionable insights
The learning analytics provided by Annoto Insights could help you gain insights into how students interact with the video content and with each other. These insights could be used to inform your instructional decisions, such as how to design and develop videos in the future, and how to engage those students who did not actively participate.
Recommended Resources
Annoto Support - If you have questions or need assistance in using Annoto, you may send your request to contact@annoto.net.
Annoto Use Guides (for instructors) - The Annoto user guides provide instructions on using features of Annoto, as well as FAQs, best practices, and example use cases.
Annoto Student Guides - The Annoto student guides provide students with instructions on how to use Annoto to participate, FAQs, and the Annoto support contact information.
Annoto Youtube Channel: The Annoto YouTube channel offers a collection of video tutorials demonstrating how to use various features of Annoto.
Using Kaltura in Canvas: This website from Kaltura includes a collection of video tutorials on how to create, upload, edit, and use Kaltura videos in Canvas.